Virtualization Based Security: A peek into the Secure Kernel
Introduction
As I got into Hyper-V research I saw there was little to no documentation or research available on the Hyper-V hypervisor and the internals of the Secure Kernel, and what little exists is opaque, making it a black hole that a lot of people would be afraid to get into. But for me it was the exact opposite; I saw a void I could fill with the knowledge I’d gain and contribute to the Cybersecurity community whose research has helped me in many different areas. With the introduction of Virtualization Based Security every Windows kernel is essentially running in an environment managed by Hyper-V, almost like a virtual machine where the kernel doesn’t talk directly to the hardware. My goal today is to guide you through the findings I had about virtualization based security and show a tool I built to debug Isolated User Mode processes.
Environment Setup
I’ll use Microsoft Windows 11 Version 24H2 (OS Build 26100.7623) as my guest running on top of Hyper-V. Make sure to enable Memory Integrity which will also enable Virtualization Based Security. If you are using Hyper-V to manage your virtual machines make sure to enable nested virtualization with
Set-VMProcessor -VMName <VMName> -ExposeVirtualizationExtensions $true
and ensure Guest Integration Services are enabled to have seamless communication between the host and the guest such as copy-paste and file sharing.
To set up kernel debugging on the guest, open Command Prompt as administrator and type:
bcdedit /debug on
bcdedit /dbgsettings net hostip:172.23.128.1 port:50020 key:1.2.3.4
And to debug the hypervisor:
bcdedit /set hypervisordebug on
bcdedit /hypervisorsettings net hostip:172.23.128.1 port:50030 key:5.6.7.8
Remember to change the IP in accordance with your environment. Note that in Hyper-V, whenever you close or change the network adapter, your guest IP will change along with the host for that switch, that includes turning off the host computer.
We’ll make some adjustments later to debug the Secure Kernel but remember this is the vanilla setup for debugging the hypervisor and the kernel. It is obvious that for the host we need a Windows machine, so I’ll be using WinDbg Preview on my host, but for some of the Secure Kernel debugging I’ll have to use the original WinDbg. Have the LiveCloudKd Live Debugging module handy, I downloaded it from here.
Note: We won’t delve into topics such as “What is the VMCS?” or virtualization in general, as there are plenty of resources online about it. A great extension for learning virtualization on Windows is hvext, which helped me a lot in my journey.
Transitioning from VTL 0 to VTL 1
Virtualization Based Security will be written as VBS, Virtual Trust Level as VTL.
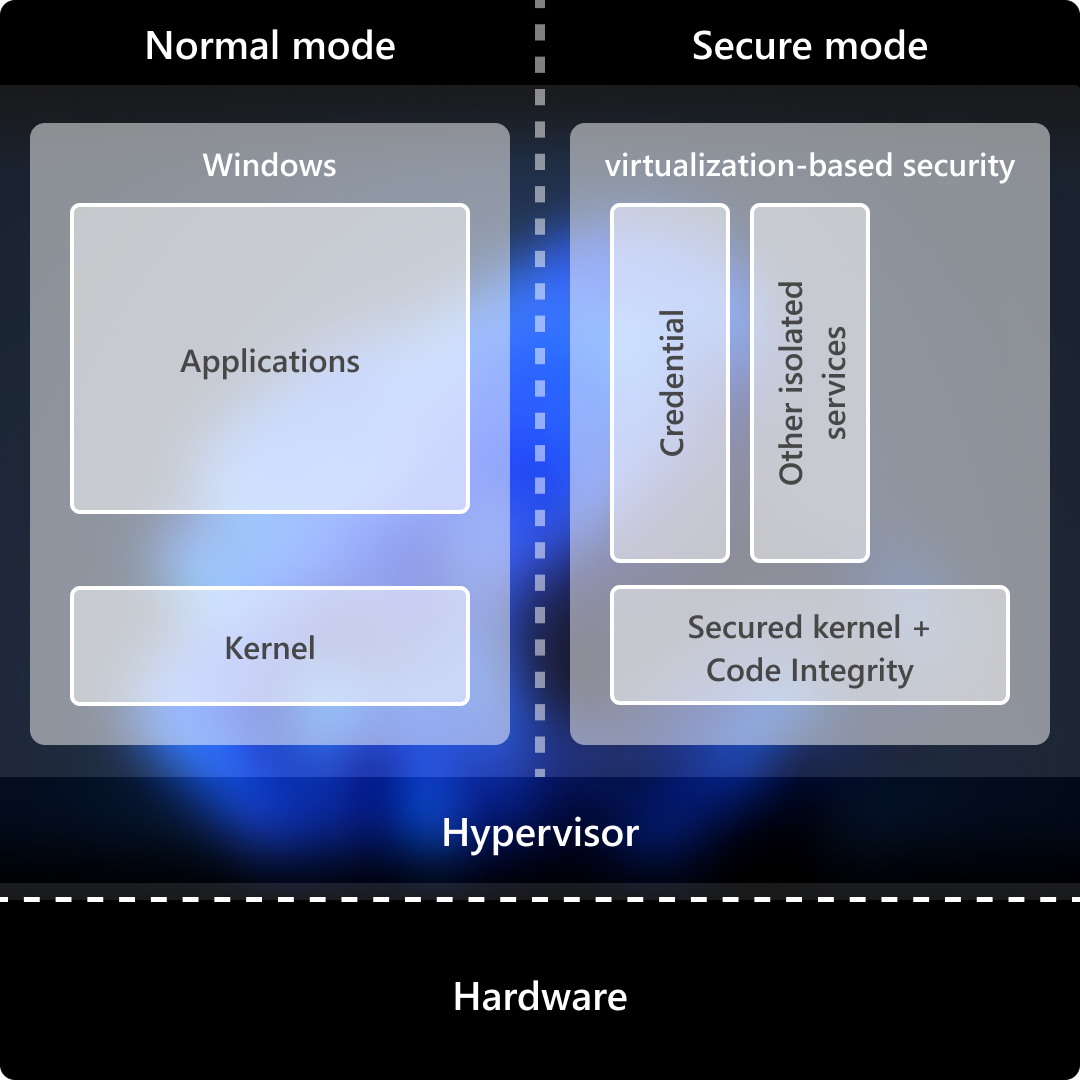
As I mentioned before, every Windows kernel runs in a sort of virtual machine. Why is that the case? With the introduction of VBS we split the operating system into the regular kernel and the Secure Kernel where the most sensitive parts of the system such as TPM and biometric data are stored in the Secure Kernel. So how do we communicate between the NT Kernel (the regular one) and the Secure Kernel? As the following diagram shows there is no direct connection or pipe between the two, so the only communication channel that can exist is via the Hyper-V hypervisor represented by hvix64.exe for Windows computers running Intel processors, hvax64.exe for AMD, and hvaa64.exe for ARM (Windows on ARM is a topic I’m very passionate about!).
On the NT side, the lowest stable-entry function in the secure-call stack is VslpEnterIumSecureMode in ntoskrnl.exe. Following its cross-references upward and outward, three distinct flows fall out: synchronous NT->SK requests (the bulk of the traffic), asynchronous SK->NT callbacks for I/O and paging, and the IUM user-mode->SK system-call path. The middle flow shares the hypercall plumbing with the first (returns the status/value for the request); only the IUM user-mode->SK system-call has an independent entry shape.
For now let’s focus on Secure calls. Back to VslpEnterIumSecureMode, we know that it accepts an SKCALL object pointer as the fourth argument and a Secure Service Call Number or SSCN as the second argument. The SKCALL structure is 104 (0x68) bytes and is used to describe the kind of operation (invoke service, flush TB (Translation Lookaside Buffer), resume thread, or call an enclave), the secure call number, and a maximum of twelve 8-byte parameters.
We can see there is a while loop that calls the function HvlSwitchToVsmVtl1 where we pass 0 as the first argument and the SKCALL structure and a SECURE_THREAD object as the second and third arguments.
__int64 __fastcall HvlSwitchToVsmVtl1(__int64 a1, __int64 *SKCALL, __int64 SECURE_THREAD)
{
  __int64 v3; // rbx
  __m128i v4; // xmm10
  __m128i v5; // xmm11
  __m128i v6; // xmm12
  __m128i v7; // xmm13
  __m128i v8; // xmm14
  __m128i v9; // xmm15
  __int64 result; // rax
  __int64 v11; // [rsp+8h] [rbp-130h]

  v3 = *SKCALL;
  v4 = _mm_loadu_si128((SKCALL + 1));
  v5 = _mm_loadu_si128((SKCALL + 3));
  v6 = _mm_loadu_si128((SKCALL + 5));
  v7 = _mm_loadu_si128((SKCALL + 7));
  v8 = _mm_loadu_si128((SKCALL + 9));
  v9 = _mm_loadu_si128((SKCALL + 11));
  result = (*&HvlpVsmVtlCallVa)(a1, SKCALL, KeGetCurrentIrql(), SECURE_THREAD);
  *v11 = v3;
  *(v11 + 8) = v4;
  *(v11 + 24) = v5;
  *(v11 + 40) = v6;
  *(v11 + 56) = v7;
  *(v11 + 72) = v8;
  *(v11 + 88) = v9;
  return result;
}
Since no vmcall is visible statically, HvlpVsmVtlCallVa is an empty memory location populated at runtime. Setting a hardware breakpoint on its load into rax reveals a small stub injected by the hypervisor that issues a vmcall with codes 11 and 12.
1: kd> dq nt!HvlpVsmVtlCallVa L1
fffff800`de401860  fffff800`6c60000f
1: kd> u fffff800`6c60000f
fffff800`6c60000f 488bc1          mov     rax,rcx
fffff800`6c600012 48c7c111000000  mov     rcx,11h
fffff800`6c600019 0f01c1          vmcall
fffff800`6c60001c c3              ret
fffff800`6c60001d 8bc8            mov     ecx,eax
fffff800`6c60001f b812000000      mov     eax,12h
fffff800`6c600024 0f01c1          vmcall
fffff800`6c600027 c3              ret
Under Appendix A: Hypercall Code Reference we can see that Hypercall code 0x0011 is HvCallVtlCall and 0x0012 is HvCallVtlReturn. If you read carefully, you noticed there’s a ret after the first vmcall, that’s because these are basically two separate code stubs injected into memory by the hypervisor. The second vmcall will be called by the Secure Kernel upon returning.
The first argument is an operation type that only becomes meaningful in light of who actually calls in with what. Walking the cross-references to VslpEnterIumSecureMode:
- op 2 - Calls to services that will dispatch
IumInvokeSecureServicein thesecurekernel.exebinary in VTL 1. - op 1 - the enclave invocation path, behind the user-mode enclave call dispatch.
- op 0 - the resume-thread family, used to re-enter a secure thread after a normal-call detour.
- op 3 -
VslFlushEntireTb, single cross-reference.
Normal hypercalls go through the
HvcallInitiateHypercallfunction in the NT Kernel.
Onto the hypervisor
Now that we’ve issued a vmcall, where is our VM exit? A VM exit is the event of the processor transitioning from VMX non-root operation back to VMX root operation which, which is basically saying we transfer execution to the hypervisor.
We will open up hvix64.exe in IDA and see a 2MB binary we don’t have symbols for, the best thing to do here is to consult existing blogs and previous comments people had on the binary, and luckily Saar Amar has written that it can help to perform a binary difference with other related Windows system files like the bootloader and the Secure Kernel.
I merged all functions with a confidence of 0.98+ and similarity of 0.99+ to hvix64.exe from these files:
ntkrla57.exe
vid.sys
winload.efi
ntoskrnl.exe
vmwp.exe
securekernel.exe
winhvplatform.dll
vmbkmcl.sys
winhvr.sys
vmbusr.sys
There are more files to diff, but after these I got enough function names for my research. The second thing I did was update the IDA 7.5 script to be compatible with IDA 9.2, Which is available here: ida92_CreatemVmcallHandlersTableWin11.py.
Searching for the VM exit handler
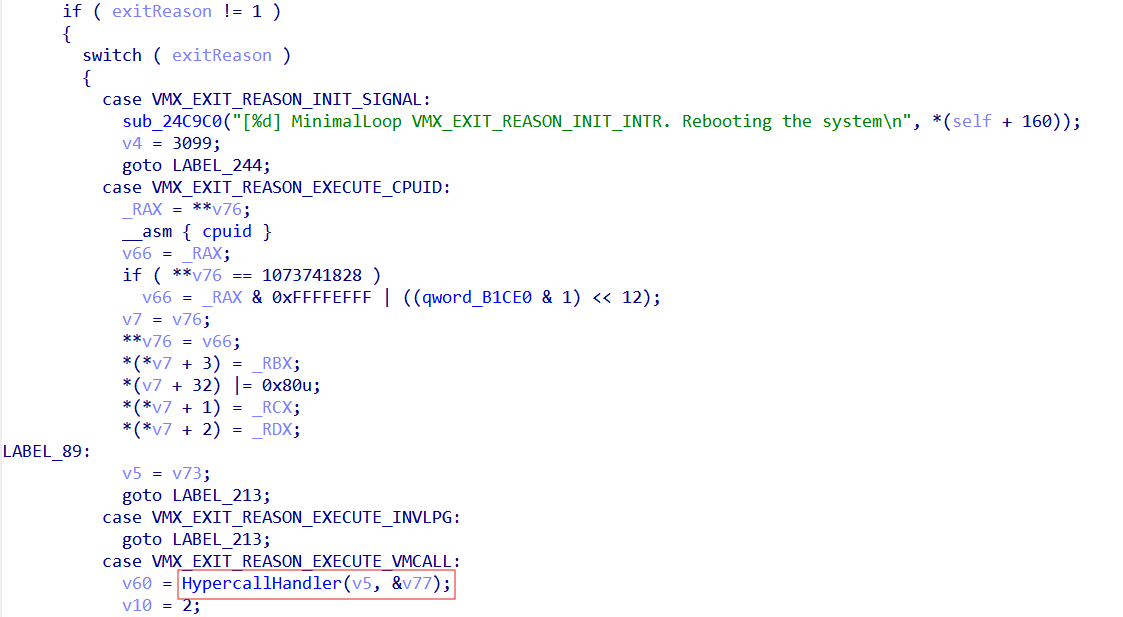
There are a few documented ways to find the VM exit handler online. The easiest would be to search for the string “VM” and you will see the string "[%d] MinimalLoop VMX_EXIT_REASON_INIT_INTR. Rebooting the system". Cross-referencing it shows only one instance in a switch statement in what appears to be our VM exit handler, due to the raw register access we see and the switch case matching specific exit reason codes. If we didn’t have this string, we could’ve just searched for a vmresume instruction, as after a VM exit we need to resume the VM. Reviewing the Intel VMX header file, we see that the integers checked for the cases match the Intel VMX VM exit reason constants. For example, 18 (0x12) is indeed in the switch case as the VMX_EXIT_REASON_VMCALL enum field, Showing us what function is responsible for executing hypercalls.
Reviewing the HvCallVtlCall hypercall
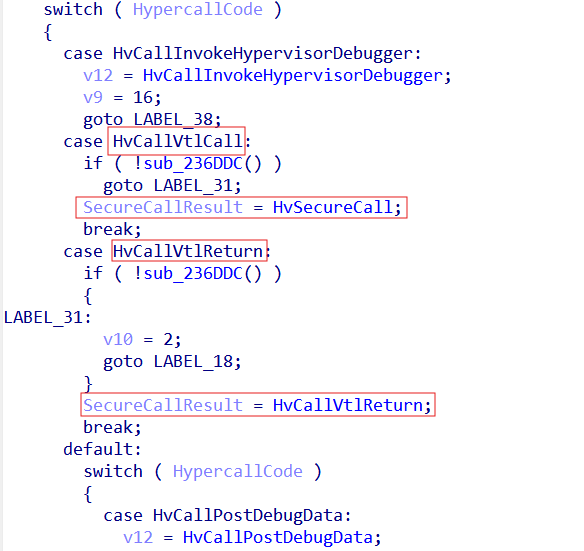
After entering the HypercallHandler function we see a similar switch case checking the hypercall code provided and dispatching the corresponding function, Using the TLFS, we know exactly where each hypercall is. In our scope are the HvCallVtlCall and HvCallVtlReturn hypercalls.
In order to understand the transition to the Secure Kernel, it helps to understand the Virtual Processor object. The Virtual Processor object is the hypervisor’s abstraction of a CPU exposed to a partition (like when we set up a virtual machine with its own processors). The hypervisor multiplexes Virtual Processors onto physical logical processors (a logical processor in VMX is a single hardware execution context as seen by the OS/hypervisor) via its scheduler. Referencing Saar’s blog, post we see that:
You will probably notice accesses to different structures pointed by the primary gs structure. Those structures signify the current state (e.g. the current running partition, the current virtual processor, etc.). For instance, most hypercalls check if the caller has permissions to perform the hypercall, by testing permissions flags in the gs:CurrentPartition structure.
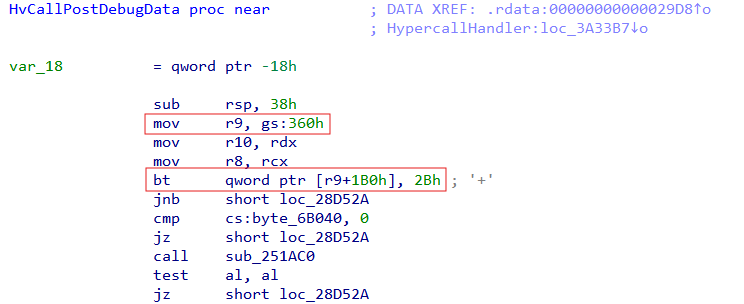
What we learn from this is that the Virtual Processor object, as well as the current partition and privilege mask, are stored in an offset from the gs register base. I expected to find the Virtual Processor reference in a hypercall function, but that wasn’t the case. However, I did see a reference to gs:360h with a bitmask at offset 0x1b0. As I saw this prologue repeat in most hypercall functions, we can safely assume that gs:360h is the “current partition” and that 0x2b is the privilege mask, specifically the debugging bit as shown in the HV_PARTITION_PRIVILEGE_MASK enum.
Now all we are left with is the Virtual Processor. So in order to find the Virtual Processor, I began by surveying references to the gs register, and with the help of the Quarkslab article I saw that the load is just two calls above the VM exit handler.
; __int64 sub_343D90()
sub_343D90      proc near               ; CODE XREF: sub_23F040:loc_23F4B2↑p

arg_0           = qword ptr  8

                mov     [rsp+arg_0], rbx
                push    rdi
                sub     rsp, 20h
                mov     rbx, gs:0
                mov     rdi, [rbx+368h] -> Load VirtualProcessor Object
                test    rdi, rdi
                jnz     short loc_343DB2

loc_343DAF:                             ; CODE XREF: sub_343D90+20↓j
                hlt
                jmp     short loc_343DAF

loc_343DB2:                             ; CODE XREF: sub_343D90+1D↑j
                xor     ecx, ecx
                call    sub_343E40
                lea     rcx, [rdi+0EC0h] -> Pass VirtualProcessor + 0xEC0 to sub_3326D8 which later on passes it as the first argument to VMExitHandler
                xor     r8d, r8d
                mov     rdx, rbx
                call    sub_3326D8
                mov     rbx, [rsp+28h+arg_0]
                add     rsp, 20h
                pop     rdi
                retn
sub_343D90      endp
The Secure Call Handler
The secure call handler will first, extract VirtualProcessor + 0x3c0, which seems to be a structure, and then will extract from what seems to be another structure at offset 0x14. The reason for the indirection is that, when we transition to a new VTL, the virtual processor doesn’t just record a new VTL number — it begins executing in the context of that VTL: a different VMCS, a different SLAT view, a different saved register file. VTLs are execution contexts. Hyper-V tracks this “current VTL” state per-VP, and in this build the active VTL substructure is reachable at VP + 0x3c0 — a pointer into the per-VP VtlArray that always aims at whichever element is currently in effect. The VtlNumber field at offset 0x14 inside that substructure tells you which VTL it represents; for VP + 0x3c0 specifically, that’s by definition the VTL the processor is currently in. For this one, IDA’s decompiler got messed up so I edited the pseudocode on my own.
void __usercall SecureCallHandler(
    _VIRTUAL_PROCESSOR *VirtualProcessor,
    __int64 SecureCallReady
)
{
    int currentVtl;          // eax
    bool isVtlInitialized;   // zf
    int mask;                // esi

    currentVtl = 1 << VirtualProcessor->CurrentVtl->VtlNumber;

    isVtlInitialized = !_BitScanForward(
        &mask,
        VirtualProcessor->VtlMask & ~(currentVtl | (currentVtl - 1))
    );

    if (!isVtlInitialized && !SecureCallReady)
    {
        FixupVtl0RipToNextInstruction(
            VirtualProcessor->VmExitInstructionLen
        );

        SetupVtlTransition(VirtualProcessor, mask);
        FinishTransition(VirtualProcessor, mask, 1LL);
    }
}
The VtlMask tracks which VTLs have been initialized; a bitmask where each bit represents the initialization state of a corresponding VTL. As shown below, the Virtual Processor structure holds two related fields: the currently active VTL and an array containing every known VTL.
VirtualProcessor->VtlMask |= 1 << targetVtl;
VirtualProcessor->CurrentVtl = VirtualProcessor->VtlArray[targetVtl];
When the secure call handler determines that the call is eligible to proceed, its first action is to advance the instruction pointer for the current VTL. An important detail to recall here is that VSM introduces two distinct VMCS structures: one associated with VTL 0 and another with VTL 1. In this scenario, VTL 0 is the current VTL, as it is the one requesting services from VTL 1 by way of the secure call. The standard convention for handling a VM exit is to increment the guest’s instruction pointer past the instruction that triggered the exit, so that when the hypervisor completes its work and a VM entry occurs, the guest resumes at the following instruction. Performing this fixup first ensures that VTL 0 returns to the next instruction rather than re-issuing the hypercall — in this case, the secure call itself. The update is performed either through the enlightened VMCS or by accessing the VMCS directly via the vmread and vmwrite instructions. With the VTL 0 instruction pointer corrected, execution moves into the transition logic targeting VTL 1. One of its preliminary checks is the requirement that the target VTL not match the currently active one.
void __fastcall SetupVtlTransition(
    _VIRTUAL_PROCESSOR *VirtualProcessor,
    unsigned __int8 TargetVtl
)
{
    __int64 self;         // rsi
    __int64 currentVtl;   // r8

    self = __readgsqword(0);
    currentVtl = VirtualProcessor->CurrentVtl->VtlNumber;

    if (currentVtl != TargetVtl)
    {
        if (byte_FFFFF800000785E0)
        {
            if ((dword_FFFFF800000785C8 & 0x2000) != 0)
                sub_FFFFF8000025E15C(
                    0x1D4D,
                    currentVtl | (TargetVtl << 16)
                );
        }

        sub_FFFFF800002AF304(self, VirtualProcessor);
        PerformVtlTransition(self, VirtualProcessor, TargetVtl);
    }
}
Here we update the VTL data to contain the new state of VTL 1 and update the current Virtual Processor state to know it’s in VTL 1 territory.
void __fastcall PerformVtlTransition(__int64 Self, _VIRTUAL_PROCESSOR *VirtualProcessor, unsigned __int8 TargetVtl)
{

    //
    // Get the new VTL 1 we target
    //
    newVtlData = VirtualProcessor->VtlArray[TargetVtl];

    //
    // Update the current Virtual Processor state to VTL 1
    //
    VirtualProcessor->CurrentVtlNumber = TargetVtl;

    //
    // Update the current VTL data for the current processor
    //
    VirtualProcessor->CurrentVtl = newVtlData;
}
With those fields settled, focus shifts to the VMCS swap: the Virtual Processor’s active VMCS must be replaced with the structure belonging to VTL 1. I’ll attribute this step to a function I’ve named TransitionToNewVtl. The incoming VTL is described by what I’ll call its private VTL data. VTL state data would work equally well as a label. And the relevance of this structure is that it holds a pointer to the target VMCS. Once that pointer is reachable, the swap proceeds: on platforms without enlightenments, vmptrld is executed against the physical VMCS address; where enlightenments are present, the VMCS is loaded by its virtual address instead.
void __fastcall TransitionToNewVtl(__int64 Self, _VTL_PRIVATE_DATA *PrivateVtlData)
{
    _HV_VMX_ENLIGHTENED_VMCS *enlightenedVmcs; // rdx
    unsigned __int64 v6; // r8
    unsigned __int64 v7; // r8
    unsigned __int64 v8; // r8
    __int64 v9; // rax
    _VTL_VMCS_DATA *VtlVmcsData; // rax
    unsigned __int64 vtlVmcsPhysAddr; // rcx
    unsigned __int64 self; // rax
    __int64 v13; // [rsp+38h] [rbp+10h]

    PrivateVtlData->VtlVmcsData->Unknown = 0;
    _RCX = PrivateVtlData->VtlVmcsData;
    enlightenedVmcs = _RCX->VtlVmcsEnlightenedAddress;

    if (enlightenedVmcs)
    {
        //
        // Do we use enlightenments?
        //
        if ((dword_FFFFF800000AECB0 & 1) != 0)
        {
            vtlVmcsPhysAddr = _RCX->VtlVmcsPhysicalAddress;
            enlightenedVmcs->SyntheticControls = 1;
            self = __readgsqword(0);

            //
            // Update the current VMCS to that of VTL 1
            //
            *(self + 0x2C680) = enlightenedVmcs;
            *(*(self + 0x2C4C8) + 0x30LL) = vtlVmcsPhysAddr;
        }
    }
    else
    {
        __asm { vmptrld qword ptr [rcx+188h] }
    }
}
Isolated User Mode
Now that we’ve grasped how we transition from the NT Kernel to the Secure Kernel, we’ll focus on the user mode side of the Secure Kernel. In Isolated User Mode (IUM), processes interact with the NT Kernel through system calls. Common IUM processes include LsaIso.exe and BioIso.exe. Even with kernel-level privileges in the VTL0 domain, it is impossible to manipulate memory in VTL1. This design defends against kernel-level attacks and protects confidential information such as user password hashes and BitLocker encryption keys. The Secure Kernel schedules system calls made by IUM processes. Existing documentation on debugging the Secure Kernel is available thanks to Yarden Shafir and gerhart. But what about debugging the processes running inside Isolated User Mode?
After launching the WinDbg debugger as Administrator and trying to attach it to the LsaIso.exe process I get the following error:
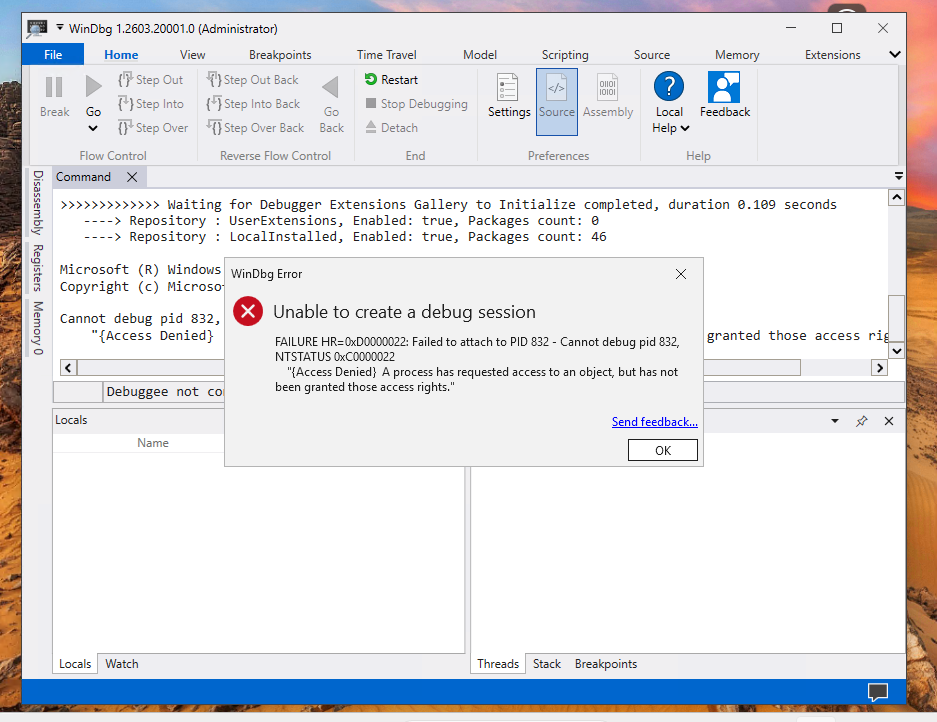 So I guess we’ve got some work to do!
Patching the Secure Kernel
Using the latest version of LiveCloudKd, I found a method to debug isolated user-mode processes within a virtual machine running in nested virtualization mode. The key insight is that the Virtual Secure Mode in the virtual machine partition isolates cross-VTL memory access permissions. For the virtual machine’s parent partition, kernel-mode hypercalls or the winhv.sys driver API can still be used to directly manipulate the virtual machine’s linear physical memory. LiveCloudKd provides a signed driver, hvmm.sys, which enables these operations through application-layer APIs. Even if this protected physical memory is allocated to VTL1 within the virtual machine, it can still be accessed from the parent partition using physical addresses. To debug IUM processes, the SkpsIsProcessDebuggingEnabled function in securekernel.exe needs to be patched. In the new version, this function is inlined in the implementation of the IumInvokeSecureService system call.
SkpsIsProcessDebuggingEnabled only grants permission to debug processes. The actual state change is done by its sibling, SkpsEnableDebugging:
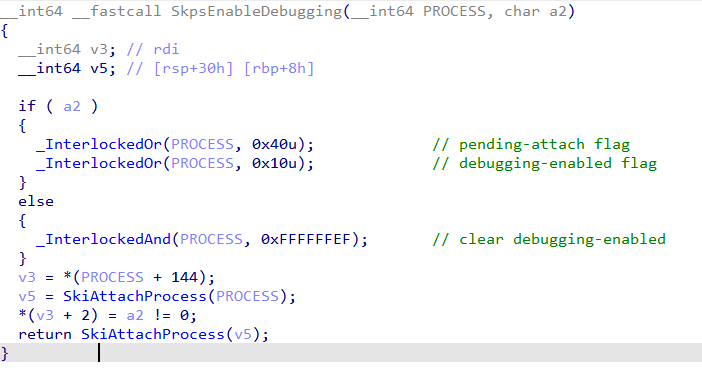
The default debugging strategy for the Secure Kernel is stored in its image strategy configuration. Directly modifying the configuration or the binary on disk will cause securekernel.exe signature verification to fail, resulting in a blue screen upon virtual machine restart. Therefore, this method is not feasible. However, patching at runtime by locating the inlined check and overwriting the failure-path branch with NOPs is enough to let SkpsEnableDebugging proceed unconditionally.
The technique pivots on three pieces of information, recovered in this order:
- The Guest Physical Address (GPA) of the page containing our patch site, found by scanning guest physical memory for a known byte signature.
- The corresponding Guest Virtual Address (GVA) and CR3, recovered by trapping a vCPU at that page and reading its registers via
HvGetVpRegisters. - The GVA to GPA mapping for the actual
SkpsIsProcessDebuggingEnabledsite, derived by walking the page tables from the recovered CR3.
The most reliably-invoked function in securekernel.exe function I found was IumInvokeSecureService – One of the largest functions in the binary, and therefore one of the easiest to fingerprint. Using SharpDisasm I located its ret instruction, then scanned guest physical memory for a byte pattern around that offset until a matching page surfaced. At the page-relative offset of the ret I wrote five bytes:
f3 90                   pause
eb fc                   jmp    0x0
c3                      ret
The 0x0 in the comment is an artifact of SharpDisasm resolving the relative target against a zero base — eb fc is jmp $-2 (signed displacement −4 from the next instruction’s address), so once patched in at virtual address V, it actually loops back onto the pause at V−2.
Modifying memory does not cause a blue screen in the virtual machine. By querying the RIPs of all vCPUs using the hypercall HvGetVirtualProcessorRegisters. If the lower bits of the RIP match the lower 12 bits of this instruction, we obtain a matching Guest Virtual Address and a matching Guest Physical Address. We can then recover the cr3 value – the base address of the page table hierarchy – also via a hypercall. With the GVA, CR3, and module base of securekernel.exe now known, locating the actual patch site is straightforward. Disassembling securekernel.exe with SharpDisasm and pivoting off the SkpsIsProcessDebuggingEnabled symbol yields the RVA of the inlined check we want to neutralize. Adding that RVA to the recovered runtime base gives the GVA of the failure-path branch, and walking the page tables from CR3 translates it to a GPA. A handful of NOPs written at that physical address overwrites the branch, allowing SkpsEnableDebugging to proceed unconditionally — and with that, attaching a debugger to IUM processes such as LsaIso.exe finally succeeds.
This will be our view after attaching a debugger to the LsaIso.exe process :)
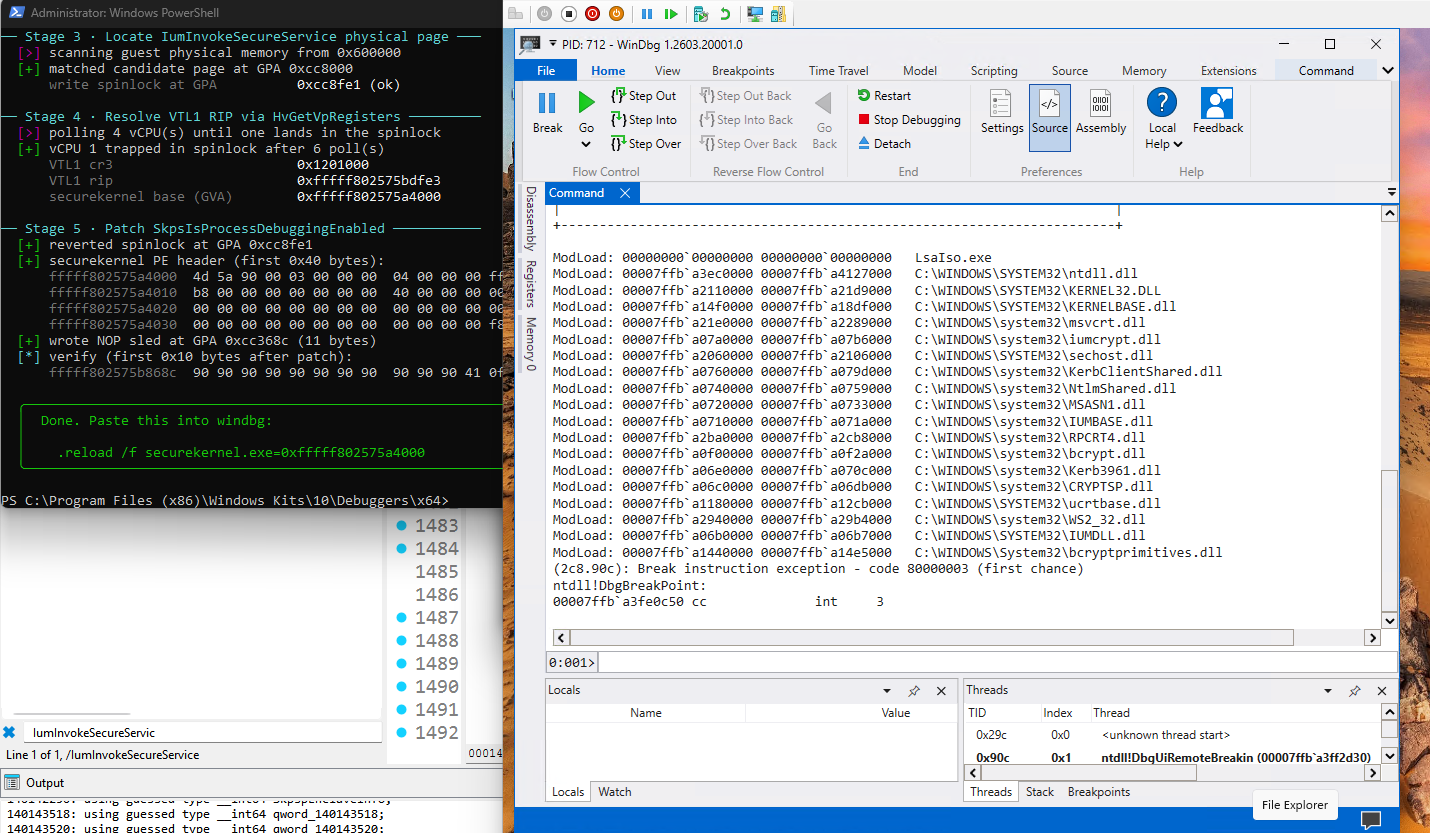
The IUM-Debugger is available for public use.
Conclusion
It’s been a fascinating journey and I’ve packed a lot into this short post. The parts I’m glad made it in: tracing how Secure Calls cross from the NT Kernel into the Secure Kernel, and walking through how to debug processes running in Isolated User Mode.
Thank you so much for reading!
References
- IUM-Debugger — https://github.com/ReverseWarrior/IUM-Debugger
-
IDA 9.2-compatible vmcall handlers table script — https://github.com/ReverseWarrior/Hypervisors-Scripts
- Saar Amar, First Steps in Hyper-V Research — https://www.microsoft.com/en-us/msrc/blog/2018/12/first-steps-in-hyper-v-research
- Quarkslab, A Virtual Journey: From Hardware Virtualization to Hyper-V’s Virtual Trust Levels — https://blog.quarkslab.com/a-virtual-journey-from-hardware-virtualization-to-hyper-vs-virtual-trust-levels.html
- Yarden Shafir, Secure Kernel Research with LiveCloudKd — https://windows-internals.com/secure-kernel-research-with-livecloudkd/
- Hyper-V Top-Level Functional Specification (TLFS) — https://learn.microsoft.com/en-us/virtualization/hyper-v-on-windows/tlfs/tlfs
HV_PARTITION_PRIVILEGE_MASKenum reference — https://learn.microsoft.com/en-us/virtualization/hyper-v-on-windows/tlfs/datatypes/hv_partition_privilege_mask- Enabling virtualization-based protection of code integrity (Memory Integrity) — https://learn.microsoft.com/en-us/windows/security/hardware-security/enable-virtualization-based-protection-of-code-integrity
- VBS Enclaves overview — https://learn.microsoft.com/en-us/windows/win32/trusted-execution/vbs-enclaves
- LiveCloudKd (gerhart01) — https://github.com/gerhart01/LiveCloudKd
- LiveCloudKd EXDI debugging module — https://github.com/gerhart01/LiveCloudKd/releases/download/v1.0.20251103/LiveCloudKd.EXDI.debugger.v1.0.20251103.zip
hvextWinDbg extension (tandasat) — https://github.com/tandasat/hvext- SimpleVisor
vmx.h— https://github.com/ionescu007/SimpleVisor/blob/master/vmx.h - SharpDisasm — https://github.com/justinstenning/SharpDisasm